• This topic is deleted!

    2
    0 Votes
    2 Posts
    5 Views
    No one has replied
  • Going live

    2
    0 Votes
    2 Posts
    410 Views
    alex_cumberlandA
    @Titchwitch Here are Oncord's full go-live instructions for reference: https://www.oncord.com/resources/learning/tutorials/settings-and-config/going-live/ Assuming you've already registered a domain name - The company you registered your domain name with will provide a portal that allows you to change the "name servers" that your domain is set to use. If you're having trouble making this change - I'd say hit up their support team, and they'll be able to assist you.
  • Problems editing marketing email - formatting goes awry

    2
    2
    0 Votes
    2 Posts
    1k Views
    S
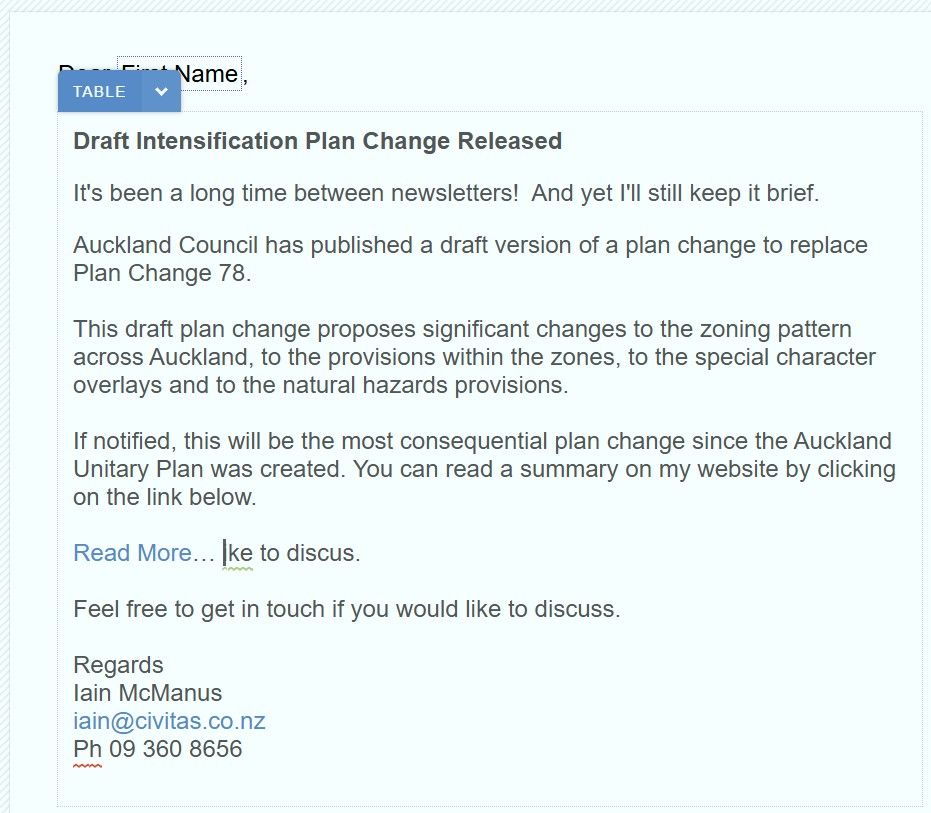
    Hi @iain I just checked your site and it looks like you got your email campaign sent off. I think what was happening there is you've pasted in a table from an email signature in Outlook or another system. That table has no borders so it is somewhat 'invisible'. When you are pressing Delete it is shifting the table to be on the same line as the "Read More" text. A little tip - you can press Control + Shift + V in Chrome to "Paste as Text". This ensures that any tables and other formatting elements are removed when you paste.
  • Forced Password Change

    2
    0 Votes
    2 Posts
    2k Views
    alex_cumberlandA
    @MrsAngell For a single contact - You can change the user's password via their contact profile. After you manually set a new password, there's a checkbox "Request change of password on next log in". It's worthwhile checking that there are no duplicate contacts using the same email with a password, because that may confuse things. If you need to handle this for a lot of contacts in bulk - there's a tool "Update Profile Email", which is available via Dashboard > Customers > Contacts, from the menu at the top of the page. This will create a drafted email for you to bulk send out (with auto-login links - so don't forward the e-mail).
  • Creating 2FA password protected pages - possible??

    2
    0 Votes
    2 Posts
    1k Views
    alex_cumberlandA
    @LF_Marketing Oncord doesn't support 2-factor login for general contacts trying to access a login-restricted website page sorry. 2-factor login is just used for administrators logging into the Oncord Dashboard. Worth noting - If you're embedding a third-party booking platform on the website, in this situation I'd say the booking app would likely handle 2FA login, rather than Oncord.
  • Pop up - "sign up to our newsletter and receive x% discount"

    2
    0 Votes
    2 Posts
    1k Views
    StephenBlignaultS
    @iwNZ See if you can get your answer from this page in the documentation: https://www.oncord.com/developer/api/controls/forms/dialogbox/
  • Related products - "You may also like.."

    2
    0 Votes
    2 Posts
    2k Views
    StephenBlignaultS
    @iwNZ Hi there. I have implemented at least 2 very popular methods in the past. Option 1: (Moderate) Show all products from the current category Option 2: (Advanced) Custom Field called Related Products Option 1: On product detail template: <logic:variable as="arrCategoryIds" value="[? \Components\Commerce\Products\Categories::getAllIdsForProduct($product['product_id']) ?]" /> <logic:variable as="category" value="[? \Components\Commerce\Products\Categories::get($arrCategoryIds[0]) ?]" /> <div class="categoryRow"> <h2>Category Products <small>([? $category['product_category_title'] ?])</small></h2> <div class="shop-grid"> <logic:variable as="currentProduct" value="[? $product ?]" /> <data:repeater id="grid-product" class="grid-product-wrap" as="product" datasource="\Components\Commerce\Products::getAllForCategoryAndBrandRecursive($category['product_category_id'], null)" paging="true" pagingrows="20" pagingautorender="true" > <data:template component="\Components\Commerce\Products" type="list" /> </data:repeater> <logic:variable as="product" value="[? $currentProduct ?]" /> </div> </div> Option 2: This option is a lot more complicated: step 1 you need to create a custom field called Related Product Ids. Use a Custom UI type, and choose Text < 255 Characters. step 2 then on each product you select your related products step 3 add a data:repeater on the product detail page to list through the related product ids, a lot like what I showed in option 1. Your Custom UI code should look like this, or similar: <forms:row label="Related Products"> <logic:variable as="selected_product_ids" value="[? [] ?]" /> <logic:if test="$product['product_related_products']"> <logic:variable as="selected_product_ids" value="[? unserialize( $product['product_related_products'] ) ?]" /> </logic:if> <forms:selectlist id="product_related_products" datacolumn="product_related_products" value="" as="relatedProduct" width="300" height="120" style="font-size: 80%;"> <forms:option value=""></forms:option> <data:repeater as="relatedProduct" datasource="\Components\Commerce\Products::getAllConsole()"> <logic:if test="in_array($relatedProduct['product_id'], $selected_product_ids, false)"> <forms:option value="[? $relatedProduct['product_id'] ?]" title="[? $relatedProduct['product_title'] ?]" selected="selected" /> </logic:if> <logic:else> <forms:option value="[? $relatedProduct['product_id'] ?]" title="[? $relatedProduct['product_title'] ?]" /> </logic:else> </data:repeater> </forms:selectlist> <p style="margin-top: 8px;"><em><small>Hold CMD or Ctrl to select multiple products</small></em></p> </forms:row> Hope this sets you on the right path.
  • Accidental footer as a header

    1
    0 Votes
    1 Posts
    1k Views
    No one has replied
  • Bulk create photo gallery

    3
    0 Votes
    3 Posts
    2k Views
    J
    @kimguevarra Thank you. I can do some coding but, probably won't pursue that path. I've decided to use a built-for-purpose option with a cloud photo storage site and simply provide a link from my Oncord site. A little less elegant but, more robust and doesn't involve bespoke coding. Besides, I was looking at hundreds of hires photos and I think that would overload the storage capacity of the Oncord plan.
  • How to bulk add posts?

    2
    0 Votes
    2 Posts
    2k Views
    StephenBlignaultS
    Hi dhondup, There are several methods that could be used to bulk import posts, but it is a lot more trickier than the examples given in the bulk update scripts tutorial. But it can be done. Things to consider: Are all your imported posts going into the same post category, or different categories, or multiple categories? Will your posts link to pages, or products, or contacts or neither: link to no other resource - and live independently as just posts? Do you want to import your posts from a CSV file? If your imported posts are to additionally generate / create a Page, then you will need to have administrators login access when running the script (most likely this will be the case) As you can see there is lots of consider. But generally speaking, you should be able to generate a post using \Components\Website\Posts::save($arrEntity) https://www.oncord.com/developer/api/components/website/posts/ If you would like further help with this, the team at Fuel can help writing an import script to suit your specific needs, especially if your posts need to link to web pages too. You can find our contact details in the link in my profile bio. Thanks
  • How to integrate Zapier with Oncord

    2
    0 Votes
    2 Posts
    2k Views
    jacobgreenawayJ
    @dhondup While I'm not intimately familiar with Zapier's interface and don't have access to an account to test thoroughly, my understanding is that something like the following should get you most of the way: Option One: Webhook Method Create a Zap in Zapier Log in to Zapier. Create a New Zap Set up the Trigger: Choose "Webhooks by Zapier" as the trigger app. Select "Catch Hook" as the trigger event. Copy the unique webhook URL provided by Zapier. Code Integration Create or Edit Your Form Define a PHP Function: In the PHP tab (SRC view), define a function to send data to the webhook URL. For example: function sendToZapier($formData) { $webhookUrl = "https://hooks.zapier.com/hooks/catch/123456/abcde"; // Your webhook URL $payload = json_encode($formData); $ch = curl_init($webhookUrl); curl_setopt($ch, CURLOPT_RETURNTRANSFER, true); curl_setopt($ch, CURLOPT_HTTPHEADER, ['Content-Type:application/json']); curl_setopt($ch, CURLOPT_POST, 1); curl_setopt($ch, CURLOPT_POSTFIELDS, $payload); curl_exec($ch); curl_close($ch); } Link the Function to the Form Submission: Use the onsubmitserver attribute in your form's HTML to call this function on form submission: <forms:form id="my_form" onsubmitserver="sendToZapier($my_form.getValues())"> <forms:row label="Field 1"> <forms:editbox id="field_1" /> </forms:row> <forms:row label="Field 2"> <forms:editbox id="field_2" /> </forms:row> <forms:row type="one_column" align="center"> <forms:submitbutton value="Submit" /> </forms:row> </forms:form> You can review using onsubmitserver to call functions in the API documentation here​. Option Two: Email Parser Method Set Up the Zapier Email Parser Log in to Zapier Email Parser: Go to https://parser.zapier.com/ and log in or create an account. Create a Mailbox: Follow the instructions to create a new mailbox. You will receive a unique email address (e.g. your_mailbox@robot.zapier.com). Code Integration Create or Edit your form Add a onsubmitemail attribute to your form with your Zapier email address. *Note that you can add multiple email addresses by comma separating. Example: <forms:form id="myform" onsubmitemail="admin@mydomain.com, your_mailbox@robot.zapier.com"> Test the Integration Fill out and submit your form. Verify in Zapier: If using the Webhook method, check the Zapier dashboard to ensure the webhook is receiving the form data correctly. For the Email Parser, Check your Zapier inbox and follow the instructions to correctly parse the form submission data.

  • Whats the best way to create post blogs?

    2
    0 Votes
    2 Posts
    2k Views
    S
    Hi @dhondup You can create a Post under Website > Posts. Then at the bottom make it Create a New Page. This will allow you to create a full page article within there. The "Post" is the listing of the article, which links to a "Page" where the full content of the article sits. Here's our help documentation on this: https://www.oncord.com/resources/learning/tutorials/website/creating-your-first-post/
  • This topic is deleted!

    1
    0 Votes
    1 Posts
    8 Views
    No one has replied
  • Introducing our new community forum

    7
    2 Votes
    7 Posts
    8k Views
    StephenBlignaultS
    @alex_cumberland Hey Alex, My name is Stephen Blignault and I am a web developer at Fueldesign where we specialise in ecommerce and custom web app development on the Oncord platform. I have been developing in Oncord since early 2018. What excites me the most about Oncord is the ability to fully customise every end-point and develop just about anything for our clients, without the headache of being full-stack developers and having to employ system admins to achieve the same result on other platforms. But the best part of Oncord is the world class support we get from the team when we get stuck with anything. It is a privilege that we honour and respect. And I look forward to paying some of this support back by helping out in the forums too. Thanks Alex